- vEUC TechCon is back!
We’re back baby! De vEUC TechCon keert terug op 14 December 2022 en is hét event voor en door de VMware End User Computing community. Bereid je voor op een geweldige dag vol kennisdeling, vette demo’s en heerlijk netwerken met oude bekenden en nieuwe gezichten! Dit jaar strijkt de vEUC TechCon neer in Pathé Leidsche Rijn, waar je na een geslaagde dag aansluitend als één van de eersten in Nederland Avatar: The Way of Water kunt kijken!
Schrijf je dus snel gratis in op de website!
https://veuctechcon.nlWe kijken ernaar om jullie allen weer te zien in december wanneer we de VMware EUC community met zijn allen vieren!
End User Computing – the Best Kind of Computing!
En heb jij een gaaf verhaal te delen met betrekking tot VMware End User Computing? Dien je sessie dan nu in via deze call for papers en wie weet schitter jij op het podium tijdens de terugkeer van de vEUC TechCon op 14 December in Utrecht!
- VMware Mobile Threat Defense – Part 1
In my last blogpost I talked about VMware SASE, click here if you missed it!
With more and more people using their mobile devices to access corporate data, the device needs to be secure. And while we are used to add security on top of a MDM platform such as VMware UEM, this is not yet the case for mobile devices. Not enough anyway.
This post tells you what it is and how it looks. Do you want to implement it? Wait for Part 2!
Today’s mobile threat landscape is diverse, and mobile workstyles call for specialized protection from phishing and application, device, and rogue network originated threats. VMware Workspace ONE Mobile Threat Defense was created with comprehensive mobile protection in mind. Through integrations with the Workspace ONE platform, mobile security is easy to deploy and manage, and offers enhanced protection designed to secure your workspace and enhance Zero Trust initiatives.
With Mobile Threat Defense, it is now super easy to add a great security product to mobile devices.
So what does it do? It checks the devices beyond what a MDM tool can do. It can find Man-In-The-Middle Attacks, Zero-Days, Vulnerabilities, bad apps and much more. Connecting it to a MDM tool like Workspace ONE UEM, it’s possible to automate actions when a threat is found. Like quarantining the device or denying access to applications and networks.
From a basic setup perspective, it will only take between 10 and 15 minutes and this guide shows all the steps to do it.
The products needed:- VMware Workspace ONE UEM
- Mobile Threat Defense (Lookout Console)
- A mobile device to test.
The console is easy to understand and looks as follows:
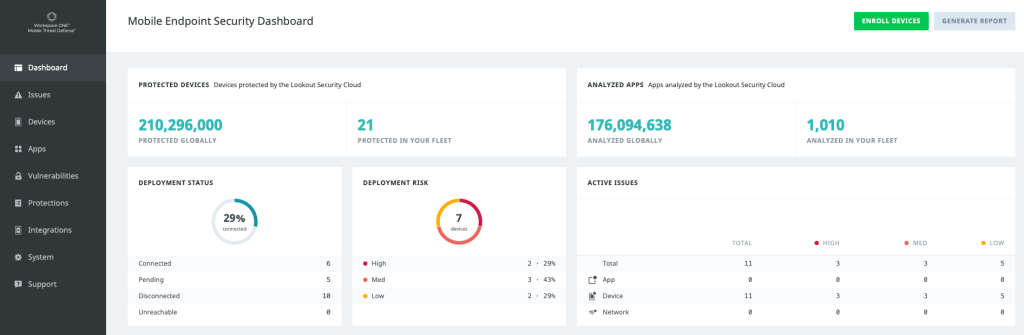
The main dashboard shows how many devices in your fleet are secured and what kind of threats are present. On the left, the console shows the different categories. This way it’s easy to see threats from a device, issue or app perspective.
On the end user side, there are two ways to deploy.
- Intelligent Hub app integration.
- Lookout for Work app
The Intelligent Hub is the easiest as it does not require more apps to maintain for IT. And it’s easier for the end user as well, one app for both management and securing devices. While the Lookout for Work app is able to see a bit more, such as phishing emails, more and more features are implemented in the Intelligent Hub.
This is how a secure devices versus an unsecured device looks like:
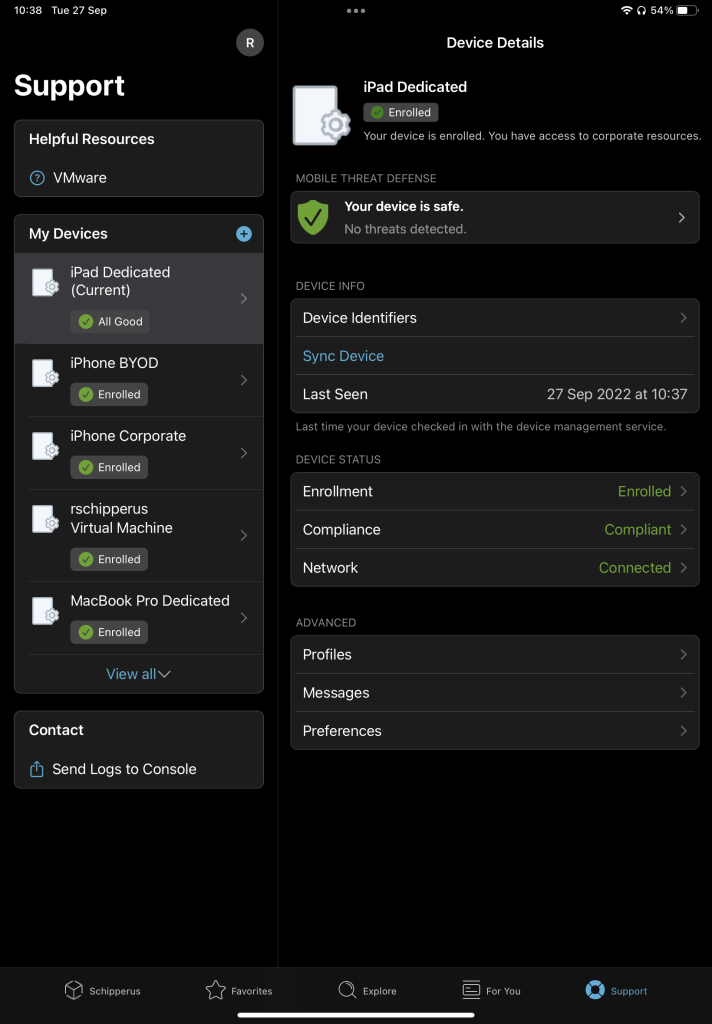
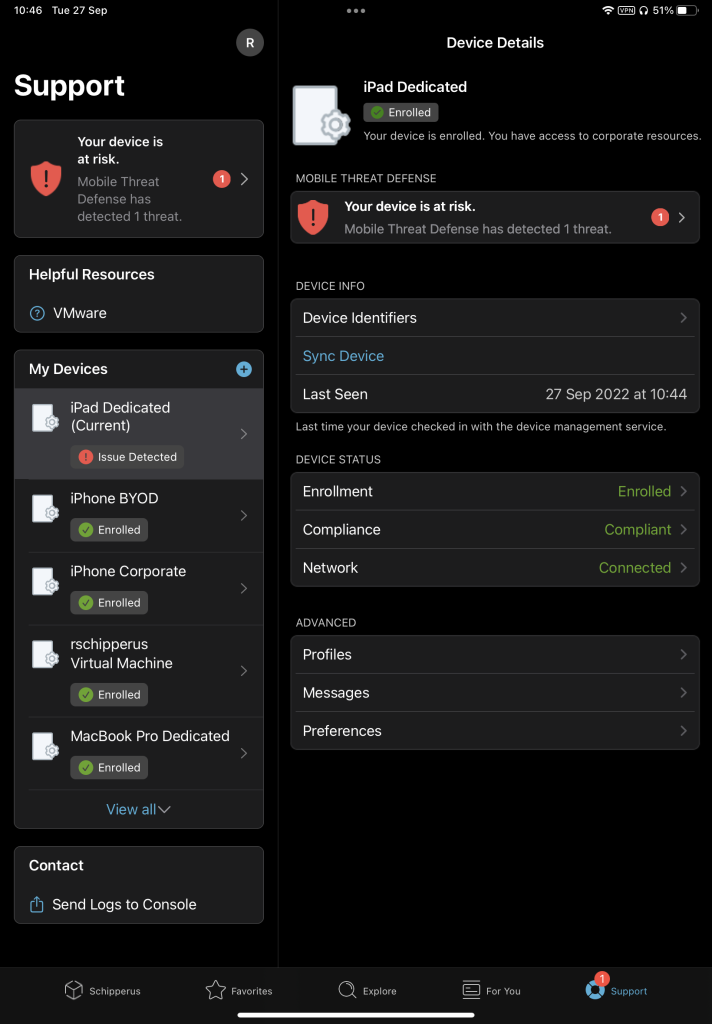
Besides showing that an issue has been found, the user is also shown how to resolve the issue, like removing an application or disconnecting from a network. Relieving the strain on IT again.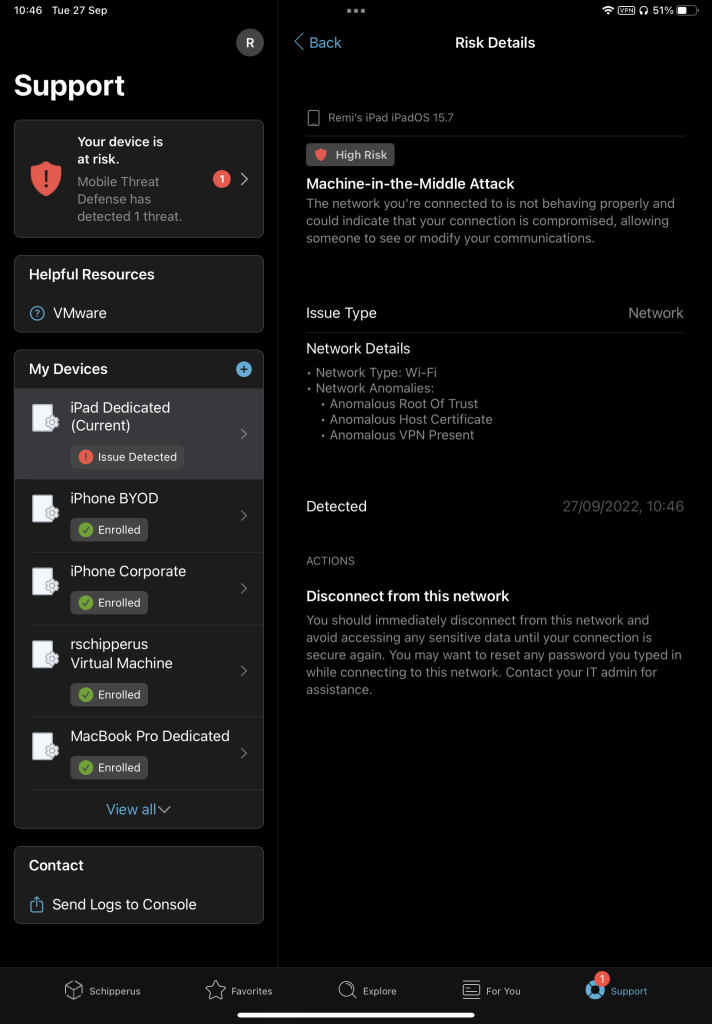
While this post gave a brief overview, part 2 will show how to set it up.
- VMware SASE Explained, Part 1.
SASE. What is it?
In this post I’ll explain what it is, what it does!
Want to configure it yourself? That will come in Part 2.So, what is SASE? Secure Access Service Edge. Now you know exactly what it is right? No? I had the same thought when I first started looking into it.
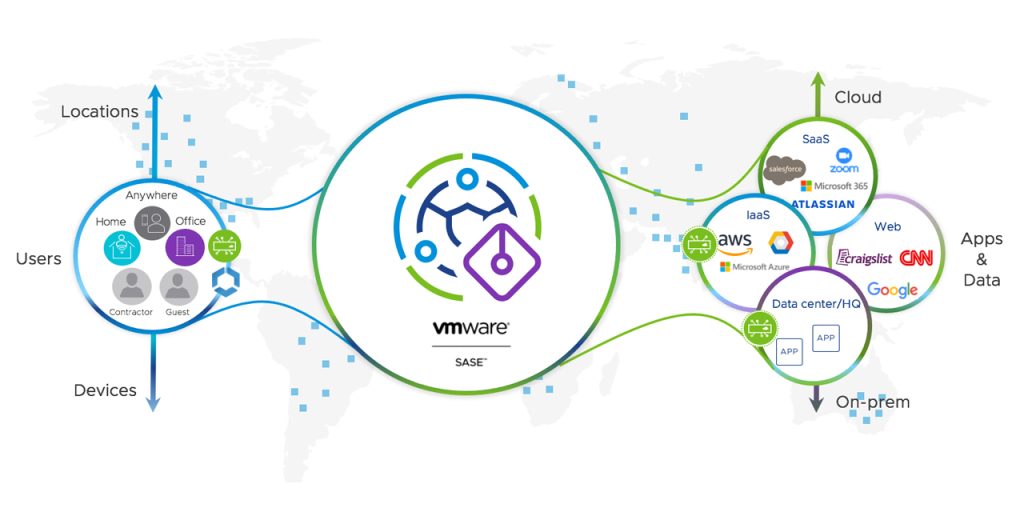
It basically means you can connect to a Server/PoP (Point of Presence), that can check your internet traffic and make cool decisions based on the content. Here is a picture of how the flow looks from left to right: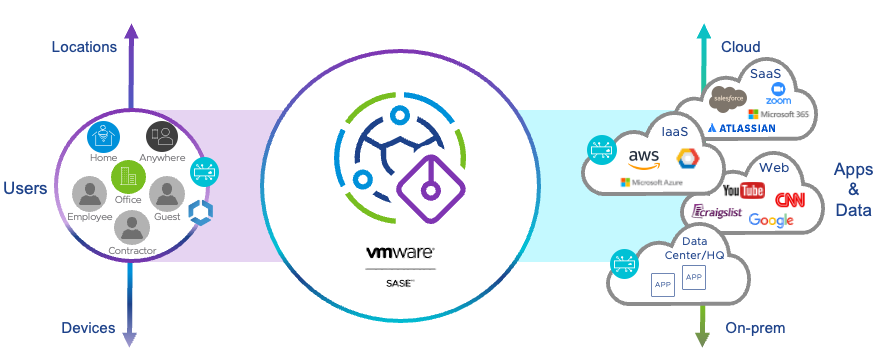
You, the user, connects to a VMware SASE PoP. From there it could connect you to the cloud, websites and internal resources. VMware SASE then decides whether this is allowed or not, based on rules created within SASE.
Still no clue what it means? Let me explain with an example:
You get an email with a malicious link in it, you click on it and it’s magically blocked. How? Because VMware SASE saw that it was a malicious link and blocked it before it could affect your device. Great right?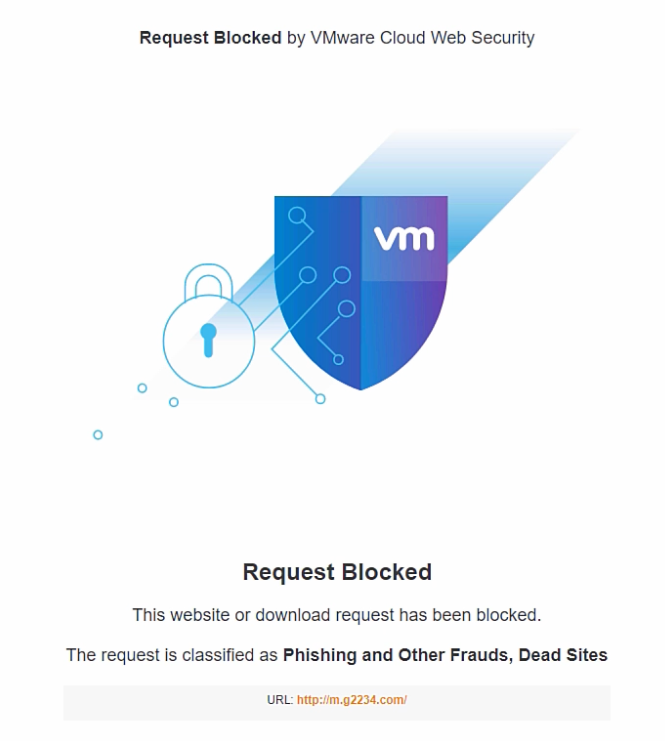
The cool thing with VMware SASE is that it can block or check the things you do online, without interfering with user experience. It can even improve user experience, as it integrates with Velocloud SD-WAN. This all means, as a company, you can make sure you keep your digital estate safe. And users can browse while being safe (or safer at least).
Through VMware SASE, multiple services are offered:
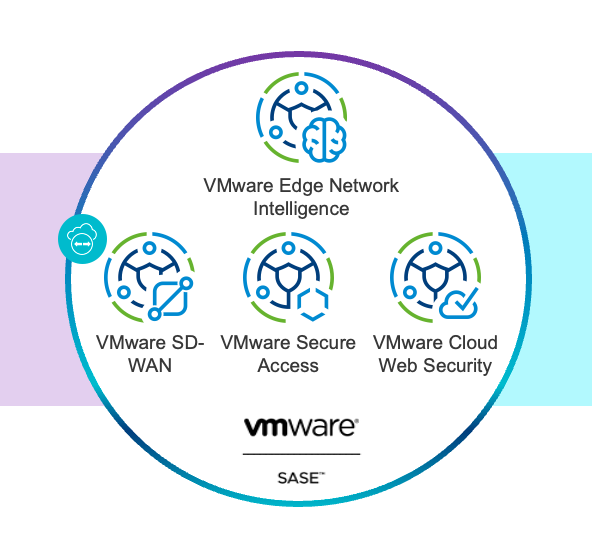
- Secure Access is a Zero Trust Network Access (ZTNA) platform that provides encrypted tunneled access between any entity and internal applications (DC, IaaS or PaaS).
- Cloud Web Security is a Secure Web Gateway (SWG) platform based on proxy architecture that provides security services for Internet or SaaS traffic.
- SD-WAN is a software-defined overlay network virtualisation technology for transporting WAN communications that ensures the best possible performance and security.
The great benefit that VMware offers, is a tightly integrated and efficient platform with one management plane for both the Security and Networking sides of SASE. And you can also start with just the networking or security functionality and add more over time.
Within Cloud Web Security, several protections are offered:
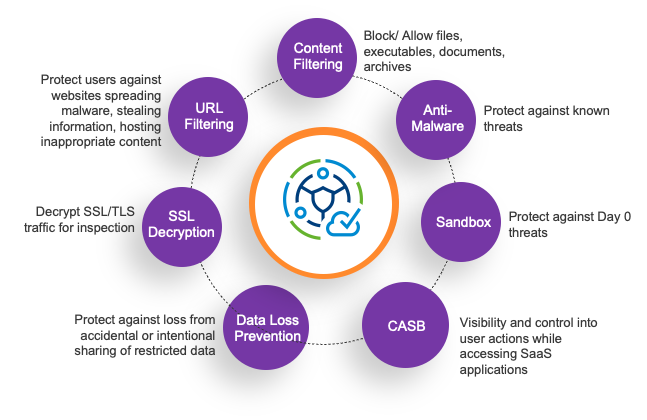
- SSL decryption: 80% of web applications are SSL encrypted. By decrypting the traffic, CWS can see what data is inside the traffic so it can make decisions. It’s also possible to bypass SSL decryption when needed, such as specific websites.
- URL filtering helps IT control which websites users can access based on categories or threats.
- Content Filtering helps control the type of document and file that can be uploaded or downloaded.
- Anti- Malware helps protect users when they download emails, documents or access active web sites against known viruses.
- Sandbox. New viruses continue to get introduced daily and it is imperative the solution can respond to Day-0 malware attacks. CWS uses a Sandbox to offer protection from those Day-0 attacks by unpacking in a sandbox.
- Cloud Access Security Broker enables IT teams to get visibility into sanctioned and unsanctioned SaaS applications. This helps IT determine what activities can users undertake when they access these applications. Can employees login, upload and download files from Drop Box? Should summer interns only be allowed to upload documents to Drop Box? Can contractors who are allowed to download files from Drop Box attach that file to the LinkedIn email? CASB helps with this.
- Data Loss Prevention. CWS ensures sensitive company data does not leave the enterprise perimeter, such as phone numbers or bank details. This is possible for both HTTP as HTTPS data, and for files that contains the data.
With all these features, you can keep your data and users safe. Integrating it with UEM, it can be easily deployed too.
That explains the what, the how comes in Part 2!
Questions? Let me know in the comments. - VMworld 2021, 5 must watch EUC sessions
The VMworld 2021 catalog is online and there is a lot to choose from. If you are looking for sessions related to the Anywhere Workspace, check out these EUC sessions.
The first session I recommend you should watch is all about our EUC Vision and announcements with Shawn Bass. This session shows how we move forward with the Anywhere Workspace solution and will include the most important updates. If you are looking for one session that covers the updates without going into depth, this is the one for you.Solution Keynote Part 1: Vision and Announcements [EUS2470]
Building on the Anywhere Workspace keynote, Shawn Bass, CTO for VMware EUC, will go in-depth on the vision and announcements for VMware Workspace ONE and Horizon. Part 1 cover the critical relationship between employee experience and zero trust security, as well as the role of automation.
Following up on the previous session, Shawn Bass will go into the weeds on SASE and Horizon. After the first Keynote, there is still be a lot to be told. So if you are looking to learn more about enabling Multi-Cloud Virtual Desktops & Application Delivery, this is the one for you.
Solution Keynote Part 2: Technical Deep Dives on SASE and Horizon [EUS2467]
The EUC Solution keynote continues with a deep dive into two important topics. First, Shawn Bass will talk about VMware SASE, VMware Secure Access, and what they mean for end-user computing strategies in a world of distributed work. Next, we will take look at what’s new in Horizon, and a deep dive into what’s coming next.
Ever wondered where the “Extreme” bit from Blast Extreme is referring to? In this session, seeing is believing. Johan Van Amersfoort, who recently wrote his second book VDI Design Guide Part II, will share his knowledge and expertise in this technical session. With demo’s, usecases and customer experiences, Johan, together with Matt Coppinger and Spencer Pitts, will blow you away.
It’s also one of the sessions that got the VMworld People’s Choice Award, so make sure you check this one out!
Blasting your way into the Extreme with VMware Horizon [EUS1834]
You will witness VMware Horizon hosting insanely intensive workloads, from cloud gaming and immersive VR training to movie making and warfighting simulation. We will show what it takes to extend VMware Horizon beyond your typical VDI use cases and into the realms of media production, gaming, simulation, training and more. You will also learn how customers are utilising VMware Horizon, Blast Extreme and more to deliver next generation services during a global pandemic. Oh, and did we mention that we will show you some demos which will blow you away? This is a must-see session for any EUC enthusiast!
Matt Coppinger, Director, Product Management, EUC, VMwareSpencer Pitts, Chief Technologist, VMware
Johan Van Amersfoort, Technologist EUC, ITQ
If you have a Tech+ Pass for VMworld then you should definitely check this on out: “Meet the Expert” for End-User Computing.
You can ask any question and the expert will answer it the best they can, as long it has something to do with EUC 🙂Ask Me Anything from the End-User Computing Experts [EUS2636]
Meet the End User Computing experts, bring your questions and ask us anything. These experts are prepared to answer your toughest questions spanning from virtual desktops and apps, unified endpoint management, security, to practical tips and tricks, successful implementations…the list goes on.
Christopher Dayton, Director, VMware
Spencer Pitts, Chief Technologist, VMware
And then, last but definitely not least, Johan Van Amersfoort will do an incredibly cool demo, together with CTO of Synterex, Jon Towles. I won’t say too much but you will not be disappointed 🙂
VDI Nerdfest 2021: Demos That Make Admins Drool
[EUS1289]At VMworld 2020, Johan Van Amersfoort presented The Nerdfest VDI Demo which blew the audience away because of the great demos which involved Horizon, Bitfusion, GPUs, ML, etc. The Nerdfest VDI Demo was an enormous success and deserves a 2021 edition. For The Nerdfest EUC Demo, Johan has teamed up with mobility expert Jon Towles to bring you a next-level, demo-packed session that will combine the slick Day 0/1 onboarding experience, with some custom-built Workspace ONE Intelligent Hub Virtual Assistant (AVA) workflows, and integration into VMware Horizon for modern managed, full clone desktops. This session promises to show you a mix of real-life use cases and some serious “Art of the Possible”
Jon Towles, CTO, Synterex
Johan Van Amersfoort, Technologist EUC, ITQ
Hope to see you there!
- Setting up the Raspberry Pi
In my previous post I explained that I was switching out my Homey Pro for a Raspberry Pi 4. Now that all the hardware is in, it’s time to set everything up! This is what I got:
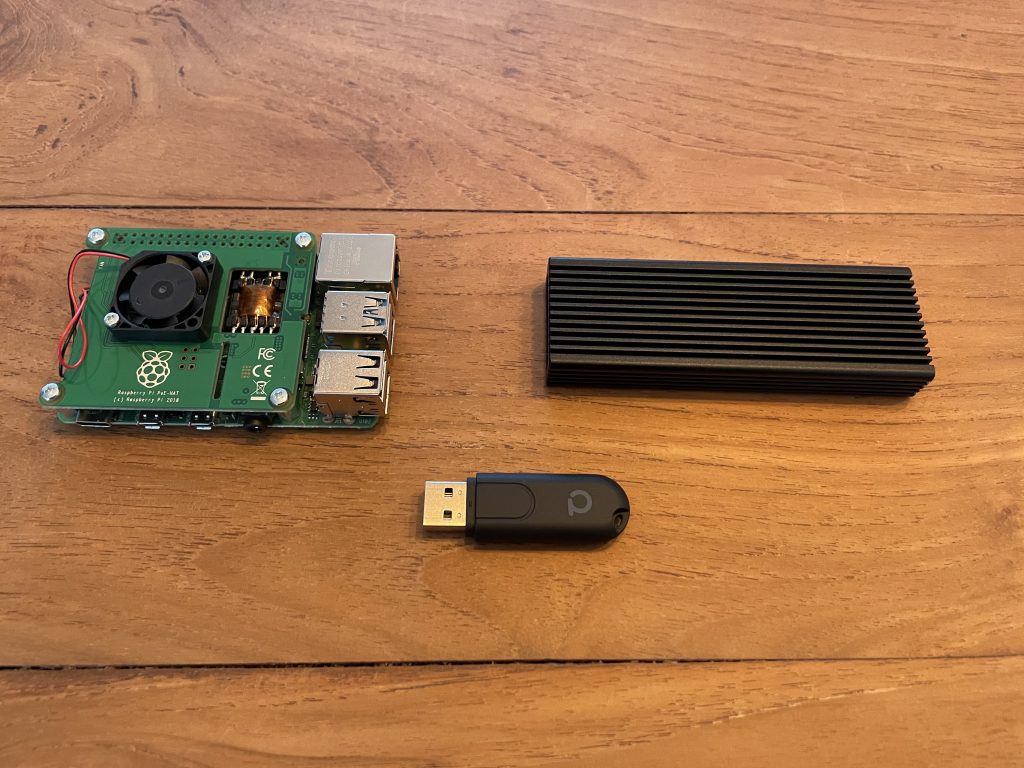
- Raspberry Pi 4 (4GB)
- Official PoE HAT
- Kingston A2000 NVMe
- ICY BOX M.2 Case
- ConBee II
Setting up the hardware.
The first thing to do is screw everything together, as that is super easy, I am not going to explain that. When everything is correctly screwed together, the SSD can be formatted and configured with the Raspberry Pi Imager. Just plug it into the computer, choose the right OS, click next and it’s done. What I do want to mention is that SSH is turned off by default. Creating a file named “SSH” on the boot folder of Raspbian OS activates this again. The next step is plugging everything in and booting up. Since last year, the Raspberry Pi supports booting from USB devices. In case yours does not work yet, try updating the Raspberry Pi to the latest Firmware and EEPROM after booting from an SD card first. Below are the commands to do this but luckily mine was ready to go.Configuring the basics.
Now that the hardware is plugged in and the Raspberry Pi is booted up, configuring everything is next on the list. Look for the Raspberry Pi on your network, remember it’s IP address and SSH to the device with:
ssh pi@There are a couple of things that need to be done before installing and configuring Pi-Hole and other programs you might want to run on the Raspberry Pi:
# Update the list of programs
sudo apt update

# Upgrade the programmes with all it's dependencies
sudo apt full-upgrade

# Reboot to activate all the changes
sudo reboot

# The next bit should not part of any regular update process!

# Update the OS kernel
sudo rpi-update

# Update the EEPROM to the latest version
sudo rpi-eeprom-update
After this, reboot again and the Raspberry Pi is all up to date.
Changing the default password is also highly recommended. Choose a strong password, you can even make use of a password manager like I do.sudo passwd
With the basics done, the Raspberry Pi is ready to be used for it’s original goal; Replacing the Homey Pro.
Installing the good stuff.
A few programs are needed to make it all work:
– ConBee (DeCONZ)
– HomeBridge
– Pi-hole (optional)ConBee:
To connect my Zigbee devices, I use a ConBee II. To read, configure and update the Zigbee stick on the Raspberry Pi, deCONZ is needed.# Set user USB access rights sudo gpasswd -a $USER dialout # Import Phoscon public key wget -O - http://phoscon.de/apt/deconz.pub.key | \ sudo apt-key add - # Configure the Stable APT repository for deCONZ sudo sh -c "echo 'deb http://phoscon.de/apt/deconz \ $(lsb_release -cs) main' > \ /etc/apt/sources.list.d/deconz.list" # Update APT package list sudo apt update # Install deCONZ sudo apt install deconzThere is one change I made after the installation, which is letting it run on another port than the default one. The reason for this is that deCONZ uses port 80, which is also used for Pi-hole. As Pi-hole overwrites the config file with every update, it’s easier to change the port for deCONZ instead.
# Change directory cd /lib/systemd/system # Open file in an editor sudo nano deconz.service # Changing the port to 8080 # Look for the following line and replace 80 with 8080 for example ExecStart=/usr/bin/deCONZ -platform minimal --http-port=8080 # Restarting the service sudo service deconz restart # Install Homebridge and Homebridge Config UI X
sudo npm install -g --unsafe-perm homebridge homebridge-config-ui-x# Setup Homebridge as a servicesudo hb-service install --user homebridgeNow go to :8080/pwa/index.html and setup your Zigbee devices.
Does your stick not show up? Make sure you use an USB-Extension cable to decrease the risk of any interference. Especially if you use an external drive connected to other USB ports like I do.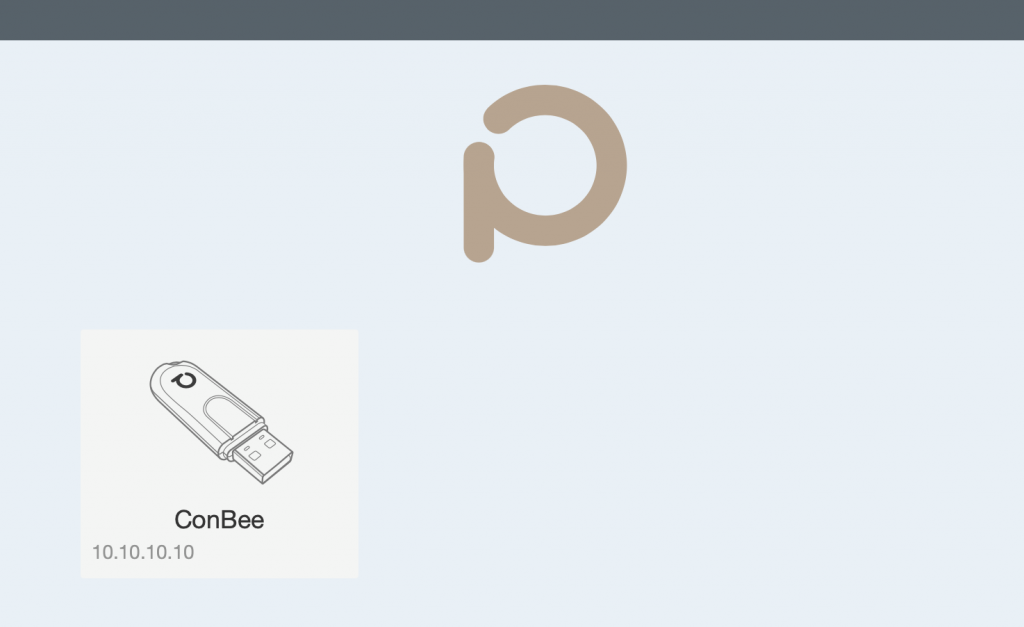
HomeBridge:
HomeBridge is an amazing application to expose non-HomeKit devices to HomeKit. When the Zigbee devices are setup in deCONZ, they need to be exposed to HomeKit too.# Setup repository curl -sL https://deb.nodesource.com/setup_14.x | sudo bash - # Install Node.js sudo apt install -y nodejs gcc g++ make python net-tools # Test if node is working node -v # Upgrade npm sudo npm install -g npm
Go to http://:8581 and install the applications. In my setup I have Nest, Ring and ConBee (uses the Hue app). Make sure to use Verified applications to minimise the risk of security or compatibility issues.

The last step is to connect HomeBridge to HomeKit. Scan the QR-Code from HomeBridge on your iPhone and you are done.
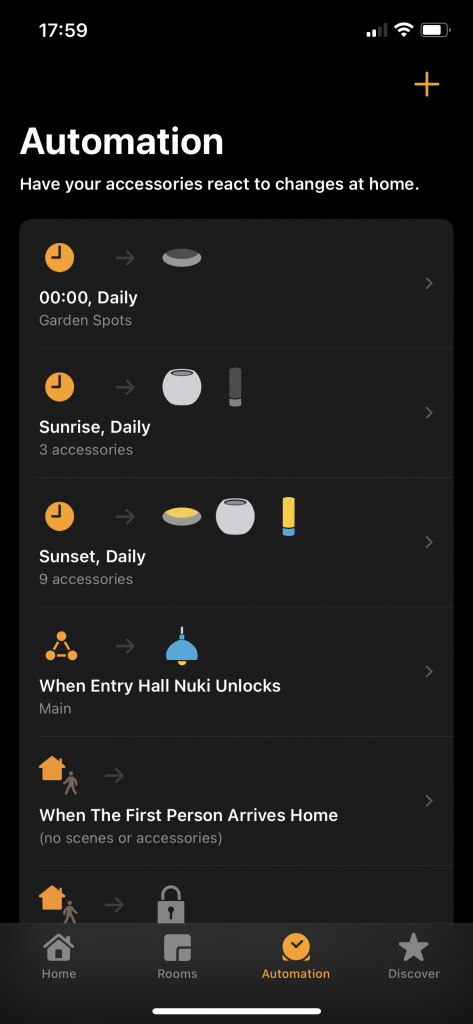
You can see that my sensors appear in HomeKit, just like the Nest Thermostat does. I already made some automations but will add more in the future.
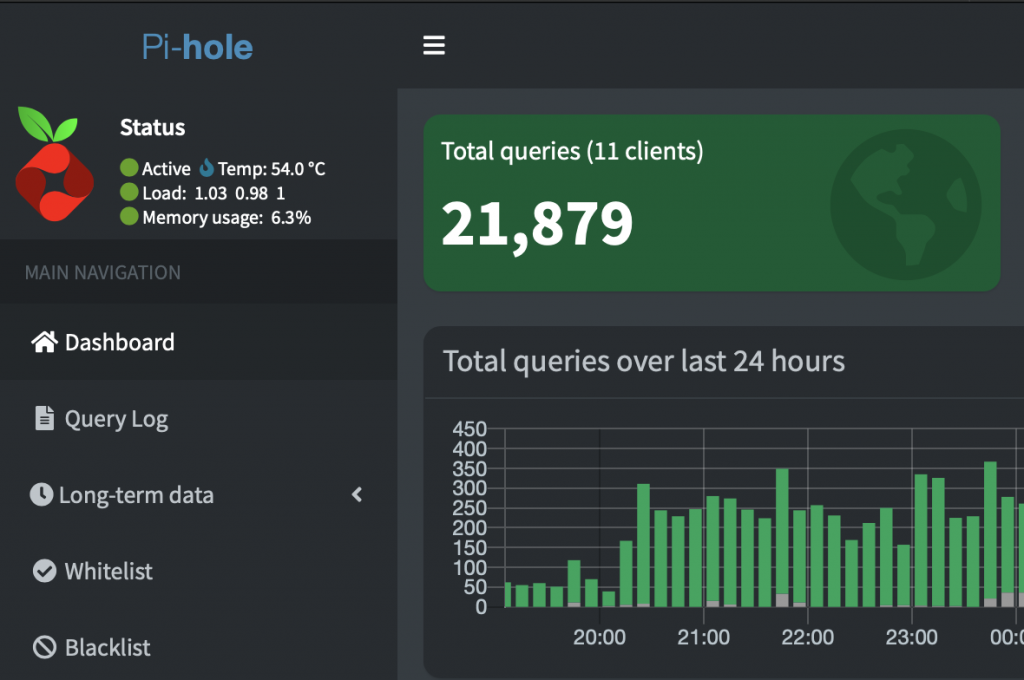
Pi-hole:
The last step is Pi-hole, which is not needed but it’s a great add-on to the Raspberry Pi. I use it as an AdBlocker for all my IoT devices in my network, plus my phones/laptops. And if you don’t want to have ads on your Smart TV, hooks hat one up too! With Pi-hole, you’ll get faster browsing and much more privacy. Check the website to learn more: https://pi-hole.net# One line install curl -sSL https://install.pi-hole.net | bash
Just go through the configuration after this and add the Raspberry’s IP as the DNS on your device in settings. Or cover all of your devices in your network and set it as the Router’s DNS server.
And that’s it!
I have replaced my Homey Pro for a Raspberry Pi and got it all working. It’s cheaper, faster and has more possibilities in the future. Let me know in the comments what you think and what you want to see next time.
Happy automating!
- Raspberry Pi with NVMe
Reading the title you must think, “That’s totally unnecessary!“. Well yeah, kinda, hear me out!
TL;DR: It’s faster, more stable and price wise not too bad nowadays.

Homey Pro (Early 2019)
I am a big fan of home automation, from Philips Hue lights to a Nuki Door Lock and much more. In the past few months I tried to combine everything together in one platform with Homey. And although it is a great platform, it was not for me. I use HomeKit for all my automations and on top of that, all of my wireless devices either use Zigbee or my own WiFi. With 95% of Homey not being used, I needed something else.
So then, as every tech enthusiast does, I went online searching for alternatives, which ended up in hours (days?) spent online. As I only need Zigbee, and already use HomeBridge, I looked for something in a small form-factor but stable enough for home automation and this time with an ethernet connection. In my case, a good alternative for Homey was a Raspberry Pi, a Zigbee Receiver and HomeBridge. For comparison:
- Homey Pro, €399,-
- Raspberry Pi 4 Set + Zigbee Receiver +-€100,-
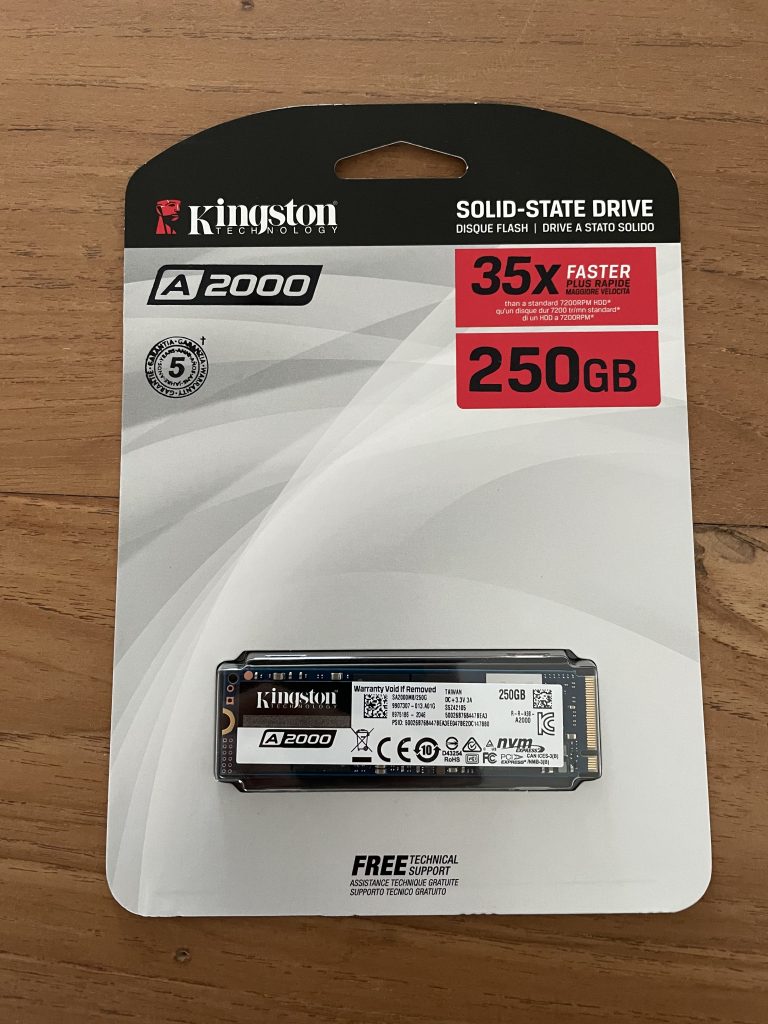
This means that I have a cheaper way of doing the same thing. Unfortunately using a Raspberry Pi with a SD card is not the most stable way, so I looked for external storage. And luckily, the Raspberry Pi 4 now (since end of 2020) officialy supports booting from an external USB device. With prices of SSD’s low enough plus the speed advantages and reliability of them, it was a no brainer to go for an SSD. After reading a great blogpost from Jeff Geerling I decided to go for an NVMe SSD. The NVMe SSD had the same price as the SATA 2,5″ SSD I was looking at (Kingston A400) and in case I repurpose the drive, it’s faster too!
This is what I went for:
- Raspberry Pi 4 (4GB), €59,95
- Official PoE HAT, € 22,95
- Kingston A2000 NVMe, €38,99
- ICY BOX M.2 Case, €39,95
- Aluminium RPI4 Case, €15,95
- ConBee II, €30,-
- Total price: €207,79
It’s not super cheap compared to the Homey Pro I was using, but I will also be using the Raspberry Pi for Pi-Hole and some other applications. On top of the hardware I will be using HomeBridge to expose my Zigbee devices to HomeKit. For automations I will continue to use HomeKit and the Shortcuts app. As soon as all the hardware is in, I will make a step by step guide on how to install it, including some pictures and recommendations.

Raspberry Pi 4 - VMware Announces Intent to Acquire Nyansa
On 21st January 2020, VMware announced its intend to acquire Nyansa (“knee-ans-sah”) . This announcement does not completely come out of thin air, as it part of the vision VMware announced back in January 2019:
Revolutionising SD-WAN with Network Edge
‘Network Edge connects and enables critical functions where the customer requirements for transformation reside — at the Edge of the Enterprise — at the branch, in the cloud, and in the data center..’
With this acquisition, VMware keeps building on its belief that SD-WAN has unlimited potential in supporting technological advancements in the networking world.
So, who is Nyansa?
We’re Nyansa (“knee-ann sah”). It’s a word from the Akan language spoken in Ghana that means wisdom from learning. Go figure. Engineers named the company, what do you expect?
Yeah we’re weird––but wonderfully humble. Unlike a lot of folks, we don’t think of ourselves more highly than we ought, but we ARE wickedly smart.
We dig data, I mean REALLY dig. It’s as simple as that. We have a bunch of PhDs from MIT, and MBA types from Harvard, Cisco/Meraki, Aruba Networks, Google guys and so on and so forth. And we’re as diverse as diverse gets. Despite all that, our geeks know how to code, right, the first time, every time. And it shows. We hope.
https://www.nyansa.com/company/“The acquisition of Nyansa will accelerate VMware’s delivery of end-to-end monitoring and troubleshooting capabilities for LAN/WAN deployments within our industry-leading SD-WAN solution,” Sanjay Uppal, VP and GM of VMware’s VeloCloud Business Unit. “Nyansa is a proven solution that solves many of the shortcomings of today’s vendor-specific solutions.”
As you can read, VMware keeps investing in technology to suit their customers and give them the best possible products. And with this acquisition, VMware keeps building towards a better and true SDDC (Software Defined Datacenter).
Additional resources to read:
- Read this blog from Nyansa founders
- Learn more about VMware SD-WAN by VeloCloud
- Diary of a Solution Engineer – Remi Schipperus

My name is Remi Schipperus and I am a VMware Solution Engineer for Healthcare & Education in The Netherlands. Two years ago, I completed my Electrical Engineering degree at the University of Rotterdam in The Netherlands. I was ready for a challenge, and the borders of my home country could not stop me. Joining VMware’s Graduate Academy program was the perfect decision! Fast forward and I am working in the field, in my home country meeting customers every week and speaking at events.
With each day bringing new challenges, being in the field can be a tough but also a very satisfying role, allow me to share with you my diary of a typical week.
- VMware Sales Academy 2017 Spotlight Series – Remi Schipperus
When I started at VMware in Cork, Ireland, I wrote a blog to share why I joined VMware.
I’ve always been interested in technology and helping people with technical problems. After working part-time in sales and finishing my Electrical Engineering Degree, I wanted to combine both my technical knowledge and the sales experience. Making the decision to enter the SE Sales Academy was easy because it combines both at a company that is on the edge of technology.
Remi Schipperus

© 2024 Schipperus. All rights reserved.
Mark says:
Thanks for your blog, nice to read. Do not stop.
12 September 2022 — 8:50 pm